not logged in | [Login]
The definitive guide by Alan DeKok is at: http://deployingradius.com/documents/configuration/active_directory.html
This document describes how to set up FreeRADIUS server in order to authenticate Windows XP network users transparently against Active Directory.
It is a step by step 'quick & dirty' guide to configure FreeRADIUS server, Network Access Points and Windows XP supplicants.
FreeRADIUS offers authentication via port based access control. A user can connect to the network only if its credentials have been validated by the authentication server. User credentials are verified by using special authentication protocols which belong to the 802.1X standard.

Refer to the graphic. Network access is only granted to the workstation if the user credentials have been authenticated by the FreeRADIUS server. Otherwise the switch port will be down for any network traffic. The RADIUS server is allowed to contact the domain controller for user authentication. Although the switch port is down, the workstation can communicate with the RADIUS server via an authentication protocol. The RADIUS server is able to check on the domain controller if the user exists and if its password is correct. If this is the case, the RADIUS server tells the switch to open the port and the user will get access to the network.
The following components are required to install the access control solution:
Linux must be configured to join a Windows domain. This is done by using the Samba file server which offers several interesting tools. The goal is not to create a Samba file server but only to use some tools which come with this server.
Samba server contains among others the following components:
Please have a look at your Linux box and check if Samba is already installed
rpm –qa | grep samba
Find the file smb.conf and open it with your preferred editor.
The file must contain the following lines:
In the [global] section
# workgroup = NT-Domain-Name or Workgroup-Name
  workgroup = XYZDOM  //the name of your domain

# Security mode. Most people will want user level
# security. See security_level.txt for details.
  security = ads


======== Share Definitions ========

 ...
 winbind use default domain = no
 password server = XYZSRV.XYZ-COMPANY.COM //your AD-server
 realm = XYZ-COMPANY.COM      //your realm
Verify the following lines in the [homes] section
comment = Home Directories
browseable = no
writable = yes
Next, find the file krb5.conf.
Normally it should be found in /etc/krb5.conf.
Edit this file with the following information: (Watch out for case sensitivity)
[logging]
 default = FILE:/var/log/krb5libs.log
 kdc = FILE:/var/log/krb5kdc.log
 admin_server = FILE:/var/log/kadmind.log

[libdefaults]
 default_realm = EXAMPLE.COM
 dns_lookup_realm = false
 dns_lookup_kdc = false

[realms]
 EXAMPLE.COM = {
  kdc = kerberos.example.com:88
  admin_server = kerberos.example.com:749
  default_domain = example.com
 }

 XYZ-COMPANY.COM = {
  kdc = XYZSRV.XYZ-COMPANY.COM
 }

[domain_realm]
 .example.com = EXAMPLE.COM
 example.com = EXAMPLE.COM

[kdc]
  profile = /var/kerberos/krb5kdc/kdc.conf

[appdefaults]
 pam = {
  debug = false
  ticket_lifetime = 36000
  renew_lifetime = 36000
  forwardable = true
  krb4_convert = false
 }
Edit the file /etc/nsswitch.conf and add winbind at the end of each line shown below
passwd:     files winbind
shadow:     files winbind
group:      files winbind

protocols:  files winbind

services:   files winbind

netgroup:   files winbind

automount:  files winbind
Restart the machine.
Verify if the Samba service is running by typing
ps –ef | grep nmbd
ps –ef | grep smbd
Execute the following command line (you must be connected as root)
net join –U Administrator
Administrator is the name of the domain controller admin. Enter your password when prompted. If everything works fine, the Linux server has been registered to the Windows domain.
Verify now if the winbindd daemon is running
ps –ef | grep winbindd
Try next if you can authenticate a user from the domain
wbinfo –a user%password
The output should be something like the following
wbinfo –a example_user%mypassword
plaintext password authentication failed
error code was NT_STATUS_NO_SUCH_USER (0xc0000064)
error message was: No such user
Could not authenticate user example_user%mypassword with plaintext password
The error is absolutely normal in this case because there are no cleartext user credentials on the domain Controller (Active Directory) for this user
challenge/response password authentication succeeded
As cleartext authentication fails, wbinfo tries a challenge/response. If a challenge/response succeeds, the Linux server is configured correctly to authenticate users against Active Directory, however despite of the success of this test, you may need to set some extra permissions on the winbindd_privileged directory (see the WARNING below)!
Let’s try to authenticate with NTLM, which is necessary for using FreeRADIUS with Active Directory.
Type the following line
ntlm_auth –-request-nt-key –-domain=<your domain> –-username=<your username>
For example
ntlm_auth –-request-nt-key –-domain=XYZDOM –-username=example_user
You will be prompted for your password.
The command line returns
NT_STATUS_OK : Success (0x0)
If the username and password are the same as those stored in Active Directory.
Note that this mechanism is based on a challenge/response of the nt-key, a character string that has been encrypted with information taken from the username and password.
During this operation, no exchange of user information takes place. Everything is based upon a comparison of encrypted strings.
When called by radiusd (thus directly setting the challenge value) the ntlm_auth program needs permission to access winbindd's winbindd_privileged directory (somewhere under /var). Read access will usually be sufficient.
The radiusd.conf file sets the uid and gid your radiusd process will run as (by the user and group directives, respectively). The ntlm_auth process will have the same identity. If your filesystem containing the winbindd_privileged directory supports POSIX ACLs, you can safely grant ntlm_auth the necessary permissions, in case your distribution's default setting were insufficient. If radiusd runs as the user radiusd for example, then you should use setfacl the following way
setfacl -m u:radiusd:rx winbindd_privileged
Or something similar. See http://www.suse.de/~agruen/acl/linux-acls/online/ or man setfacl for more information on POSIX ACLs!
(Under Debian Wheezy (and possibly other systems too), this is located in /var/run/samba/winbindd_privileged. Because /var/run is a symlink to /run, you won't find it with grep)
Download first the latest source of Openssl (0.9.7f was used for this HOWTO).
Extract the source files from tarball
tar –zxvf openssl-0.9.7f.tar
Install openssl in /usr/local/openssl/
./config --prefix=/usr/local/openssl shared
make
make install
Download the latest version of FreeRADIUS from www.freeradius.org.
This document refers to version 3.0.0 of FreeRADIUS.
Install FreeRADIUS with the following option
./configure
make
make install
In order to get FreeRADIUS working, the following files must be configured:
Please refer to the documentation contained within clients.conf to authorize additional NAS to connect to the server.
Your entry should look something like this example
client 192.168.2.44 {
        secret                = 2!34r&dp0t
        shortname             = 192.168.2.44
        nastype               = cisco
}
The secret is a common password between the switch and RADIUS server. It is necessary to prevent the installation of wild access points. (Remember to set up the secret as well on your switch!)
Shortname is the IP address of your switch. (Watch out to use the correct one and not the IP address from this example!)
Nastype indicates the type of access point. In our case it is Cisco hardware.
If you have many NAS, it may be easier to specify a range and use the same shared secret for them all
client 192.168.2.0/24 {
        secret          = 2!34r&dp0t
        shortname       = network1
}
Open this file and set the following
with_ntdomain_hack = yes
with_ntdomain_hack is necessary to correct an error due to the challenge/response and the format in which the user information is sent.
The following line is the most important one. It allows using the Windows Domain Controller (Active Directory) for authentication.
Uncomment it and set the correct path to the ntlm_auth binary
ntlm_auth = "/path/to/ntlm_auth --request-nt-key --username=%{%{Stripped-User-Name}:-%{%{User-Name}:-None}} --challenge=%{%{mschap:Challenge}:-00} --nt-response=%{%{mschap:NT-Response}:-00}"
You may also wish to add
--domain=%{mschap:NT-Domain}
When using machine authentication, you might want to try the following:
--username=%{%{mschap:User-Name}:-00}
In this file we specify the authentication method used by FreeRADIUS. We chose the PEAP (Protected EAP) method because it allows to use MSCHAPv2, a challenge/response protocol to authenticate against an Active Directory Windows Domain.
Replace the line default_eap_type = md5 with default_eap_type = peap.
Proceed to section
tls-config tls-common {
Replace the line random_file = ${certdir}/random with random_file = /dev/urandom.
For this tutorial the rest of the settings are correct, as snakeoil certificates will have been created as part of the build process.
The configuration of this file is not necesary to enable authentication against the Active Directory, it is only necessary for advanced usage of FreeRADIUS.
One of this advanced features, (among others) is the case when we want to have some local users which are available even when Active Directory is not.
Open your raddb/users file with your favorite editor and add one line per local user
username1     Cleartext-Password := "user-password1", MS-CHAP-Use-NTLM-Auth := 0

username2     Cleartext-Password := "user-password2", MS-CHAP-Use-NTLM-Auth := 0

username3     Cleartext-Password := "user-password3", MS-CHAP-Use-NTLM-Auth := 0
and so on (Obviously, set your own local username and passwords).
Note the MS-CHAP-Use-NTLM-Auth := 0; in this line we are telling FreeRADIUS that username1 with password user-password1 will not be pre-processed by the ntlm_auth auxiliary program, i.e. it will not request the key to compare credentials against Active Directory, but instead, compare against the users file of the FreeRADIUS configuration directory.
It is important to verify that the line
authorize {
    ...
    #  Read the 'users' file
    files   # <--- This one!
    ...
}
Is uncommented in the authorize section of the sites-available/inner-tunnel.
This chapter illustrates the configuration of a Windows XP supplicant. No additional installation is needed to do this. Unfortunately you cannot use this authentication method for Windows 2000 operating systems. Microsoft’s patch (Q313664_W2K_SP4_X86_EN.exe) makes it only available for wireless interface adapters. Perhaps third-party supplicant software may solve this issue, but I did not find any at the time of writing this tutorial.
First, for enhanced security install the FreeRADIUS server CA certificate (the CA that signed the cert you installed in eap.conf).
Open the network configuration panel select the network card and enter the properties.
Select the « Authentication » tab.

Activate « Enable IEEE 802.1X authentication for this network » For EAP type, chose « Protected EAP » from the list and then click the « Properties » button.
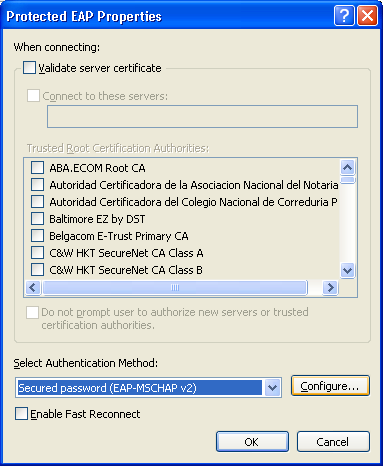
Certificate validation is strongly recommended for wireless configurations, and optional for wired deployments.
Select « Validate server certificate » and check ONLY the CA for your FreeRADIUS server (the one you installed above). Also select « Connect to these servers » and enter the Common Name of the server certificate.
If you are configuring a wired ethernet interface, you can leave certificate verification off in your supplicants: just deselect « Validate server certificate ».
Either way, select « EAP-MSCHAP v2 » as authentication method. Click the « Configure » button next.
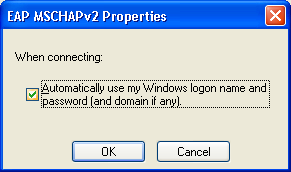
Check if « Automatically use my Windows logon name and password (and domain if any) » is activated. Otherwise the user will be prompted to authenticate after Windows login. when using machine authentication, the following error might happen:
ERROR: (4) eap_peap: TLS Alert read:fatal:unknown CA
ERROR: (4) eap_peap: TLS_accept: Failed in unknown state
...
ERROR:  (4) eap: Failed Continuing EAP PEAP(25) session. EAP sub-module failed
This is due to the fact that the FreeRadius server CA certificate was not "imported" correctly. Follow the following steps to import the CA server certificate into the local computer account:
- open a new mmc (mmc.exe)
- add "certificate (local computer)" to the console root
- import the CA certificate into the 'trusted CA root'.
IX Self-signed certificates TLS and PEAP require both server and client certificates. To generate the requested certificates, it is recommended to use the script « CA.all » that comes with FreeRADIUS. CA.all uses the configuration of the openssl.cnf file. It is possible to replace the certificates later by those obtained from a real certification authority.
Open the file openssl.cnf. It is located in /usr/local/openssl/ssl
Replace/add the following lines. Note that the config file contains the password < whatever >. It’s the certificate password.
Please replace the green items with the ones that correspond to your country and company
# req_extensions = v3_req

# The extensions to add to a certificate request

[ req_distinguished_name ]

countryName = Country Name (2 letter code)
countryName_default = LU
countryName_min = 2
countryName_max = 2

stateOrProvinceName = State or Province Name (full name)
stateOrProvinceName_default = Luxembourg

localityName = Locality Name (eg, city)
localityName_default = Luxembourg-city

0.organizationName = Organization Name (eg, company)
0.organizationName_default = XYZ

organizationalUnitName = Organizational Unit Name
organizationalUnitName_default = IT

commonName = Common Name (eg, YOUR name)
commonName_max = 64
commonName_default = administrator

emailAddress = Email Address
emailAddress_max = 40
emailAddress_default = operations@xyz.com

# SET-ex3 = SET extension number 3

[ req_attributes ]

challengePassword = A challenge password
challengePassword_min = 4
challengePassword_max = 20
challengePassword_default = whatever

unstructuredName = An optional company name
We are going to use this information 3 times when executing CA.all.
During the first pass, this information produces the root certificates. We can accept all default values while this pass.
The second pass produces the client certificates. We have to change the CommonName for the name of the client.
During the third pass, we have to change only the CommonName to the name of the server.
Before executing the script, check the following line in the CA.all script
echo "newreq.pem" | /usr/local/openssl/ssl/misc/CA.pl –newca
CA.all is located in the scripts subdirectory of FREERADIUS’ source directory. In case of doubt try the command.
find / -name CA.all
When executing CA.all, we produce the 9 following certificates
root.pem, root.p12, root.der
cert-clt.pem, cert-clt.p12, cert-clt.der
cert-srv.pem, cert-srv.p12, cert-srv.der
The server needs the files root.pem and cert.srv.pem in order to work with PEAP.
Move all the files to /etc/raddb/certs/. Do not forget the demoCA directory.
The original article was written by Charles Schwartz, Network Security Engineer.
Sponsored by Network RADIUS ![]()